
Over time, as WordPress rolls out new software updates, newer versions of PHP are required to support them. In this post, we outline a procedure to update PHP on an Ubuntu-based, WordPress host server. As always, before implementing any changes, you should make a backup copy of your blog. While the following procedure did not cause any problems on our particular system, updating PHP can affect applications that depend on it (e.g. WordPress) in ways that one might not anticipate.
1. Access host server
First, you need to gain access your WordPress host server through an account that can run in sudo. To comply with Ubuntu documentation, we recommend implementing server changes from the safety of a non-root account. Accordingly, commands below that require root permissions on your server are preceded by sudo. And just as a heads up, all commands that follow we entered the command prompt.
2. Add PPA repository
Now that you’ve gained access, we need to set up a link to where we can download new PHP versions. Fortunately for us, Ondřej Surý maintains a repository of PHP builds for Ubuntu, so we will not have to build from source code. Add the link to his PPA repository to apt-get and update.
$ sudo add-apt-repository ppa:ondrej/php
$ sudo apt-get update
When the time comes to install PHP core and extensions, the files will be downloaded from this source.
3. Generate list of existing PHP packages
Next, to ensure that dependent applications function properly after the upgrade, you need to install updated versions of PHP packages that currently installed on your server in older versions. Of course, you need to do the same with the updated core files as well. To get a list of current PHP packages on your server, you can filter dpkg output, keeping only entries with “php” in their names, and write them to file.
$ dpkg -l | grep php | tee packages.txtAfter producing the list, use your favorite text editor to take a look at the contents; the list should look something like
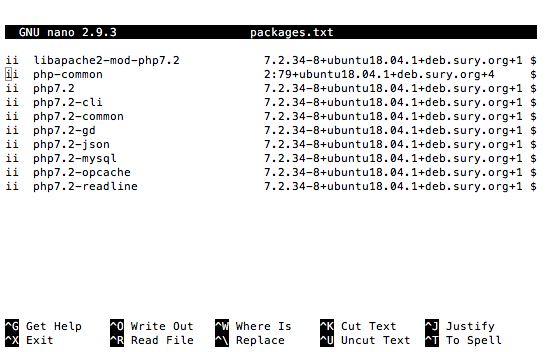
dpkg -l output.4. Install PHP core and extensions
Now you’re ready for installation. First, you need to install the core files using apt. Core files to be installed are php7.x, php7.x-common, and php7.x-cli. You can install them, after substituting subversion number for x, as follows
$ sudo apt install php7.x php7.x-common php7.x-cli[Note: the “x” above is a wildcard for your relevant sub-version of PHP 7. In examples that follow, x = 4 for an update to PHP 7.4.]
Next, after the core files are installed, go back and look at your text-file list generated in step 3. Append to the sudo apt install directive each PHP extension listed there. Successive entries must be separated by a space. Again, you need to replace dot number of the updated version for x. Here’s an example:
$ sudo apt install php7.x-curl php7.x-mbstring php7.x-bz2 php7.x-readline php7.x-intl5. Set up web-server integration
This next step is critical. You need to set up Apache to interface with your PHP update. If your server runs PHP as an embedded Apache module, indicated by “prefork” in apachectl -V output, then you must install libapache2-mod-php7.x with the directive
$ sudo apt install libapache2-mod-php7.x Here’s example apachectl -V output for the prefork case
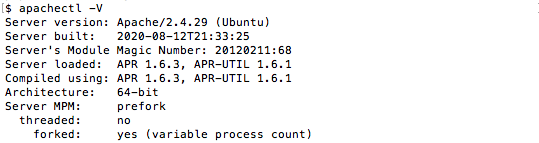
apachectl -V output for prefork MPM Apache configuration.Alternatively, if you’re running Apache server using mod_event multi-processing, Apache can be integrated with PHP with php7.x-fpm. Install and enable the package with commands
$ sudo apt install php7.x-fpm
$ sudo a2enconf php7.x-fpm
6. Verify Install
To make sure php 7.x is properly installed, enter php -v. Output should show the subversion number x of the update.

php -v command. For this case, after an update to PHP 7.4.For a list of installed modules, enter php -m. Output should include package names that you added in step 4. Often existing modules may become deprecated on new releases of PHP. Fortunately, you can often resolve these issues by installing the relevant replacement packages.
7. Activate new PHP version
After verifying installation of the updated versions of PHP core and extensions, you need activate them in Apache. Enter the following pair of commands below, with php7.w in the first line–the old version to be disabled–and php7.x for the updated version to be enabled in the second line.
$ sudo a2dismod php7.w
$ sudo a2enmod php7.x
8. Check enabled PHP version in Apache
Finally, confirm that your server is running the updated PHP version either by opening up a browser to address https://your.server.domain/info.php. Successful activation of PHP 7.x will be a page with version number in the banner that matches your intended update.
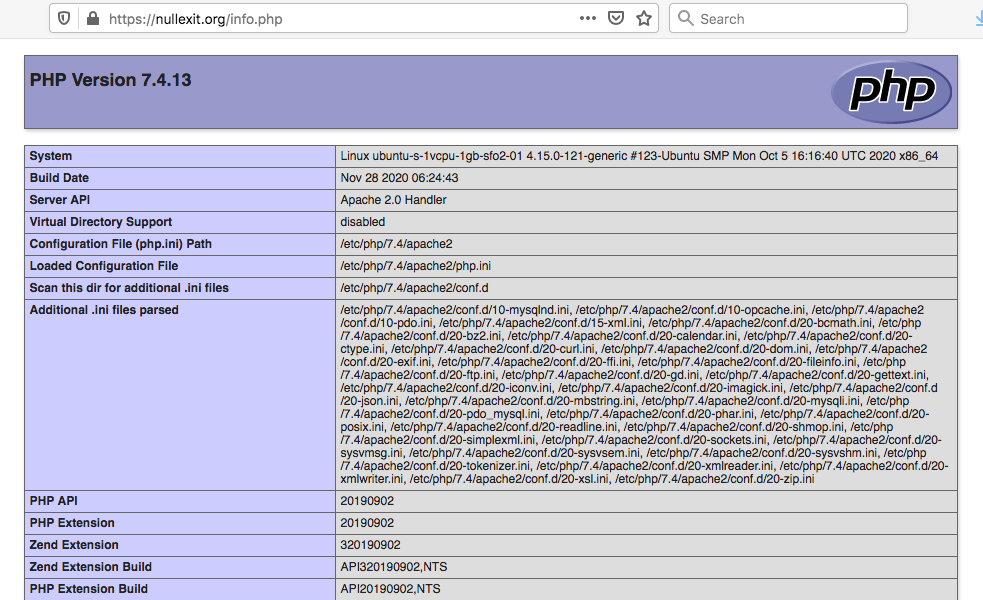
https://your.site.domain/info.php page indicating successful activation of updated PHP version–for this case PHP 7.4.If you have not already set up an info.php on your website, you can enter the following directive at the command line
$ a2query -m php7.xIf the update is indeed active in Apache, php7.x will appear in the output.

With that last step complete, you should be all set to log back into WordPress. From the dashboard, you can confirm that PHP 7.x is its supporting version.
Sources
- Canonical Ltd. Ubuntu, 2020. https://ubuntu.com/server/docs/security-users
- Ondřej Surý Launchpad Site. https://launchpad.net/~ondrej
- PHP Watch: Upgrade/Installation guide for PHP 7.4 on Ubuntu and Debian, 2019-11-28.