
Contents
Overview
Last time, in part two, we built and tested our set container class, ModSet(), with a variety of methods that will prove useful when we construct the power set. Methods included copying, nesting/unnesting, filtering to keep only unique members as well as set-union and set-subtraction operations. You will see that most of these will be used, either implicitly or explicitly, in both Binary Mask and Recursive methods of generating power sets.
Preliminaries
Our ModSet() class definition is a must (obviously); let’s run its script so it will be ready and waiting for us when it comes time to make an instance. You can download the script from github here: modset.py
%run modset.py
When we are ready to build our power set, we’ll measure the time it takes each of the two routines to complete, so we can compare their performance. As a preliminary, let’s import the time module so it stands at ready.
import time
Of course we will need an example source set to operate on. Let’s define it now and be done with it.
clumsyPrez = ModSet(set([ 6.1, 2021, "fight like hell", "we love you",('impeachment','#2')]))
Binary Mask power set generator
In this iterative-based approach, we will populate the power set by applying binary masks to extract out member subsets, one-by-one, from the source set in ModSet().val. If you recall, a verbal description of power set generation using a binary mask we discussed way back in part one; you can find it here. Below, we first provide an overview of our binary mask power set generator routine, followed by the routine itself, with heavy commenting, concluded with a detailed walk-through after that.
Overview
The method, named .powerSet_bin(), contains 19 lines and calls .pushDown() and .union() sibling methods. Though we could use NumPy here to make mask generation and member extraction more compact, we did not want to confound the comparison (to our recursive approach to follow) by incorporating functionality of an external module. Already, the code has been somewhat compressed by use of generator expressions.
Flow of control
The routine below can be divided into two main blocks: variable initialization, and the run-time loop that builds each binary mask for extracting the corresponding subset on each iteration. The loop populates the power set member-by-member and terminates when all $2^n$ members have been added. Because indexing is crucial in this approach, you’ll notice heavy use of range() and list() data-types. As you’ll see later, our recursive approach requires no such crutch.
class ModSet():
    .
    .
    .
    # Generate powerset via direct, binary mask approach
    def powerSet_bin(self):

        ## Initialize local variables ##
        S = list(self.val)         # convert to list for indexing
        setSize = len(self.val)    # count number of members in source set
        psetSize = pow(2, setSize) # calculate the number of elements in the power set
        lastIndex = setSize - 1    # index value of last member
        setIndices = range(0, setSize)  # make indices list for source set
        psetIndices = range(0, psetSize) # make indices list for power set to be built
        bMasks = [[False for s in setIndices] for p in psetIndices] # Initialize binary mask
        pSet = ModSet(set())  # initialize power set as empty ModSet() instance
        pSet.pushDown(1)  # and nest it down one level for later joining

        ## Populate powerset with each subset, one at a time ##
        for i in psetIndices: # loop through each member of power set

            ## Generate binary mask for subset i of power set ##
            val = i  # assign current pSet index as current "value" of mask
            for j in setIndices: # loop through each bit-digit of mask

                if (val >= pow(2, lastIndex - j)):  # if mask value >= value of current bit,
                    bMasks[i][lastIndex - j] = True # then set corresp. mask bit to "true"
                    val -= pow(2, lastIndex - j)    # subtract value of current bit from
                                                    # mask value to determine next bit-digit
            ## Form subset i of power set ##
            # Use generator expression for compactness
            dummySet = ModSet(set([S[k] for k in setIndices if bMasks[i][k] == True]))
            dummySet.pushDown(1)  # nest ModSet instance down one level for union join
            pSet.union(dummySet)  # include new subset in power set

        return pSet, bMasks  # return complete power set and binary masks as output
Aside: initializing the mask
To have each and every element alterable in our list of binary masks, bMasks, we need to individually assign each and every element within the nested list. If you attempt to initialize bMasks like this, bMasks = [[False]*len(setIndices)]*len(psetIndices)], (as we did on our first attempt!), you will find that you cannot change individual elements of bMasks later on. That is
bMasks =[[False]*3]*5
bMasks[3][1] = True
bMasks
changes to True all row-entries in the second column, rather than just the fourth, since all point to the same instance of True. However, if you initialize bMasks using a list completion, the nested list assembles with a hash to a unique instance for each and every element therein
bMasks = [[False for j in range(0,3)] for i in range(0, 5)]
bMasks[3][1] = True
bMasks
so that we can make the individual bit flips necessary for our routine. Our apologies for the digression; we felt the need to address this “rookie” Python mistake for those who may be unaccustomed to using list objects in this, possibly unusual, manner.
Testing the binary mask routine
With the binary mask routine complete, we’re ready to build our power set. Below we’ve sandwiched the call within two time.time() reads, so we can measure its runtime duration. Let’s examine bMasks output first.
tStart = time.time() # clock start timestamp
pSet_bin, bMasks = clumsyPrez.powerSet_bin() # call our binary mask power set generator
duration = time.time() - tStart # calc run duration by subtracting tStart from current time.
bMasks # show list of binary masks
Above, you can see that masks progress from all False to all True in a logical pattern. This ordering would be a great feature if we cared about how members are ordered in our power set. But sets, strictly defined, are not distinguished by the ordering of their members (Van Dalen, Doets, De Swart; 2014). That is, set $\{a, b, c\}$ is equivalent to set $\{c, a, b\}$ and $\{b, a, c\}$, and so on.
So, after taking a look at our power set in pSet_bin, we see that the nice ordering was all for naught.
# Report duration of binary mask power set generation
print('The Binary Mask approach took %0.6f seconds to complete.'%(duration))
print('The power set contains %i subset elements'%(len(pSet_bin.val)))
pSet_bin.val # show power set output; remember, this is a set!
From the power set output string above, it looks like we have many sub-set instances as members of one big super-set. But, if you recall from all the way back in part one, this is not the case; our power set pSet_bin is actually a ModSet() object, whose .val attribute is a set, each element of which is another ModSet() instance that contains one unique sub-set of the original source set (as its .val attribute). We defined the ModSet.__repr__() method to return the code representation of its .val attribute; that’s the reason why the return string from calling pSet_bin.val appears in this set-resembling format.
Recursive power set generator
Overview
Our recursion-based method for generating power sets contains just 11 lines of code but requires five sibling methods, as well as itself, to run. Though .powerSet_rec() has fewer lines than .powerSet_bin(), it relies more heavily upon behavior of sibling methods in the ModSet() class, i.e. .__copy__(), .pushDown(), .diffFunc(), .union() and .removeDuplicates() to perform the respective obligatory processing tasks of duplication, nesting, extraction, joining and filtering. Unlike the Binary Mask approach above, indexing is not needed here, and hence, not employed. Through recursion, we can generate the identical power set using thoughtfully-placed set-subtraction, -union and -filtering operations.
class ModSet():
    .
    .
    .
    # Generate power set recursively.
    def powerSet_rec(self):

        pSet = self.__copy__()      # Preserve self instance; its copy, pSet
                                    # will be altered
        pSet.pushDown(1)            # Nest pSet for later joining.

        if len(self.val) > 0:       # Recursion termination condition
            for elSet in self.val:  # Iterate through members of set self.val
                # Generate subset that remains after removing current
                # element, elSet, from set self.val
                dummySet = self.diffFunc(ModSet(set([elSet])))
                # To current powerset, append the powerset of the
                # subset from previous step
                pSet.union(dummySet.powerSet_rec())  # Self-call power set method,
                                                     # union join power set of
                                                     # dummySet with pSet
            return pSet             # Return power set at current
                                    # level of recursion
        else:
            dummySet = ModSet(set())  # Generate instance of ModSet of empty set
            dummySet.pushDown(1)      # Nest empty set down one level so it can
            return dummySet           # be union-joined in the recursion level
                                      # above (that called this current run).
Flow of control
First a duplicate of the calling instance is made to serve as the (local) power set within our routine. This instance is promptly pushed down one level so it can be joined by union later, if necessary. Next, the number of elements in the calling instance are counted. If empty, an empty ModSet() instance is returned on exit of the routine. This case path is the exit condition for the recursive flow; eventually all calling instances will dwindle down to empty as members are stripped from them in the alternative, non-empty, case that we’ll describe next.
If the calling instance is not empty, .powerSet_rec() iterates over the elements therein, each time subtracting out the current element, elSet, and calling itself again to build the power set from elements that remain. Output from this recursive call is then joined by union with pSet. Remember that every time pSet.union() runs, it calls the filtering method removeDuplicates() to retain only unique members in pSet as it is assembled.
When the loop completes, and all subsets have been included at the present level, the local instance of pSet is returned so that it can be union-joined with the pSet instance inside the calling-function one level above. The method continues in this fashion until pSet at the top-most level of recursion is fully populated, at which point output is returned in response to the initial method call.
[Phew..!]
Let’s give it a whirl and gauge its run-time duration.
Testing the recursive routine
tStart = time.time()
pSet_rec = clumsyPrez.powerSet_rec()
duration = time.time() - tStart
print('The Recursive approach took %0.6f seconds to complete.'%(duration))
print('The power set contains %i subset elements'%(len(pSet_rec.val)))
pSet_rec.val
As promised, we see the same power set as we saw from the Binary Mask approach. But unlike that approach, there is no mask output for us to examine this time.
Quick-and-dirty efficiency comparison
For a given programming objective, recursive algorithms tend to be less efficient than their iterative equivalents when used in imperative-based languages, like Python, where iteration is preferred (Recursion (computer science), Wikipedia). Below we hobbled together a quick script to measure, and statistically compare, processing times of the two methods of power set generation of clumsyPrez. We instruct the two power set generators to each run 500 times in a randomly alternating sequence to destroy potential processing-related biases (e.g. sequential, timing) that could otherwise arise by running the two in separate blocks.
import numpy as np
import matplotlib.pyplot as plt

# routine to repeatedly collect run-time durations
# of functions genFunc1 and genFunc2
def genDurationsDist(genFunc1, genFunc2, nReps):
    durations = np.zeros(2*nReps)  # initialize output array
    genFuncs = [genFunc1, genFunc2] # make list of the two functions to run
    # initialize an array to contain the run-sequence of the two functions
    funcSeq = np.concatenate([np.zeros(nReps), np.ones(nReps)]).astype(int)
    np.random.shuffle(funcSeq)  # shuffle the ordering of the sequence
    for i in np.arange(0, funcSeq.shape[0]): # iterate over random sequence
        tStart = time.time() # start timestamp
        genFuncs[funcSeq[i]]() # run one of the two functions based on funcSeq
        durations[i] = time.time() - tStart # end timestamp, calc duration
    # separate and return the two sets of durations
    return durations[funcSeq == 0], durations[funcSeq == 1]

durations_bin, durations_rec = genDurationsDist(clumsyPrez.powerSet_bin,
                                                clumsyPrez.powerSet_rec, 500)
Now that we have distributions of processing times from the two power set generators, we can plot histograms and Q-Q plots to get an idea of their locations and shapes.
import nonparametric_stats as nps
plt.rcParams['figure.figsize'] = [7, 5]
durs = (10**3)*np.array([durations_bin, durations_rec])

# Obtain color cycle that matplotlib uses
prop_cycle = plt.rcParams['axes.prop_cycle']
colors = prop_cycle.by_key()['color']

# plot histograms of duration distributions
labels=['Bin. Mask', 'Recursive']
ax = nps.histPlotter(50, *durs, labels=labels, colors=colors)
ax.set_title('Runtime durations of 2 power set generators')
ax.set_xlabel('duration (msec.)')
ax.set_ylabel('counts')
ax.legend()

# Examine Q-Q plots to compare distributions to
# their corresponding theoretical normal dists
fig, axs = plt.subplots(nrows=1, ncols=2)
fig.tight_layout()

for i in range(0,2):
    nps.qqPlotter_normal(durs[i], 30, axes=axs[i], color=colors[i])
    axs[i].set_title(labels[i] + ' gen. Q-Q')
    axs[i].set_xlabel('theoretical normal')
    if i == 0:
        axs[i].set_ylabel('data')


The two distributions certainly do not appear to be normally distributed; they depart from Normal theoretical very early on. Consequently the typical two-tailed Student t-test cannot be used here. Below, we import and run the Mann-Whitney non-parametric comparison test to assess if the difference between the two reaches statistical significance.
from scipy.stats import mannwhitneyu as mwu
med_bin = (10**3)*np.median(durations_bin) # compute median duration of Bin. Mask ps durations
med_rec = (10**3)*np.median(durations_rec) # compute median duration of Recursive ps durations

print('Median Bin. Mask duration: %0.2f msec., Median Recursive duration: %0.2f msec.'\
      %(med_bin, med_rec))
# Run non-parametric test to determine if differences between
# distributions are statistically significant
uStat, pVal = mwu(durations_bin, durations_rec)
print('Mann-Whitney U statistic: %0.2f, p-value: %0.2e'%(uStat, pVal))
Measuring the time elapsed for each of the two approaches, we find that, on average, our recursive algorithm does indeed take about twice the time to complete on our machine as the binary-mask method (4.59 ms versus 2.11 ms, U = 487, p < 0.01). Of course, ours is certainly not a very controlled comparison; so please take the result with “a grain of salt” if you will.
Summary
In part one we discussed power sets and their relation to the binary theorem. In addition, we mapped out a recursive procedure for generating the power set. A brief investigation revealed that Python’s set() class could not accommodate our need to include subsets within a set as in the case of power sets. To solve the problem, we introduced a custom container class with a set-valued attribute, whose instances are “hashable” and thus, eligible for membership in set objects.
Starting with the container strategy from part one, in part two we expanded our custom class, ModSet(), to include methods that perform copying, nesting, uniqueness-filtering, set-union and set-difference operations as well as others. We verified that all ModSet() methods functioned as desired. Many of the methods added would prove necessary for both methods of power set generation to follow.
In part three, we realized our goal of generating power sets. First, we detailed program flow of both the Binary Mask and Recursive approaches of power set generation. The mask routine used list indexing and took more lines of code than recursive method, but called fewer class methods. Our Recursive approach was shorter in terms of lines of code because it incorporated more sibling methods of the ModSet() class. We then explained the control flow of the recursive generator hoping to illustrate how recursive algorithms function. Finally, we compared relative run times of the two approaches. It turned out that, as expected, the Binary Mask routine took less time to run than its recursive counterpart.
Lastly, stay tuned for part foura where we’ll walk-through and test a more efficient algorithm for generating power sets in the ModSet() class.
Sources (part 3)
1. D. Van Dalen; H. C. Doets; H. De Swart (9 May 2014). Sets: Naïve, Axiomatic and Applied: A Basic Compendium with Exercises for Use in Set Theory for Non Logicians, Working and Teaching Mathematicians and Students. Elsevier Science. ISBN 978-1-4831-5039-0.
2. Recursion (computer science), Recursion versus Iteration, Wikipedia.
The complete ModSet() class
You can download ModSet()‘s complete definition from github: modset.py

The ModSet() class by nullexit.org is licensed under a Creative Commons Attribution 4.0 International License.
Power sets in Python: an object-oriented approach (part 2)
Overview
In part one, we showed that instances classes are hashable, so they can be included as elements of a set object. If the class instance happens to have a set-valued attribute, we effectively have a set with another set as a member, made possible by the instance acting as a “container” (Bernstein, M). In the post that follows, we’ll craft a new class that incorporates the container behavior illustrated in part one, as well as a number of other methods that will prove necessary when we build power sets in part three.
Define a set container class
Using the illustrative example in part one, we will define a new class, ModSet(), with the same constructor and representation methods. New instances of the class will require a set argument, either occupied or empty. In addition, we will define methods to copy, nest and unnest instances of the class.
class ModSet():

    # Instance constructor
    def __init__(self, setElement):
        self.val = setElement  # set arg saved in .val attribute

    # String eval representation of self instance
    def __repr__(self):
        return self.val.__repr__() # Return string eval represent.
                                   # of string object in .val

    # Method to make a copy of self instance
    def __copy__(self):
        return ModSet(self.val)

    # Modify .val to contain the set of itself, of itself, ...
    # nesting .val "depth" number of levels.
    def pushDown(self, depth):
        while depth > 0:
            self.val = set([ModSet(self.val)])
            depth -= 1

    # Remove one nesting level from set in self.val.
    # If un-nested, ignore.
    def pullUpOneLevel(self):
        listSet = list(self.val)
        if len(listSet) == 1:
            self.val = listSet[0].val
        else:
            pass

    # Remove height number of nesting levels from set in
    # self.val by repeatedly calling above method
    def pullUp(self, height):
        while height > 0:
            self.pullUpOneLevel()
            height -= 1
Testing these, let’s define a set of mixed immutables and nest it three levels deep.
worldlyPrez = ModSet(set([('televised', 'summit'), 'DMZ', 12.6, 2019, '\"bromance\"']))
worldlyPrez.pushDown(3)
worldlyPrez
Raising that result back up three levels should return the set to how it was originally defined.
worldlyPrez.pullUp(3)
worldlyPrez
If you instruct to pull up greater than the set is deep, the extra ascents are ignored.
worldlyPrez.pullUp(2)
worldlyPrez
Enforcing uniqueness
Just like Python’s set class, we will make sure that each member of ModSet be unique according to the value of its .val attribute. When a ModSet is comprised of immutables, the set() class enforces uniqueness for us automatically. However, if a ModSet contains other ModSets, we require an additional method to enforce uniqueness among them as well.
class ModSet():
    .
    .
    .
    def removeDuplicates(self):
        uniqueSet = set()  # initialize as empty the unique set to be built
        for s in self.val:  # s is a member of the ModSet().val set
            inUniqueSet = False  # initialize match detection flag as false
            sTest = s  # default conditional testing value for s
            for us in uniqueSet: # us is a member of the uniqueSet set
                usTest = us  # default conditional testing value for us
                if isinstance(us, ModSet): # if member us is a ModSet
                    usTest = us.val        # change testing value to its attribute
                if isinstance(s, ModSet):  # if member s is a ModSet
                    sTest = s.val          # change testing value to its attribute
                if usTest == sTest:  # compare us and s testing values on this run
                    inUniqueSet = True  # if match, set existence flag to true
            if not inUniqueSet:    # only add member s to uniqueSet if
                uniqueSet.add(s)   # match is NOT detected
        self.val = uniqueSet    # set .val to the uniqueSet from above
Testing the uniqness enforcement method
After we added removeDuplicates() to our class definition, we can test it as follows.
prez1 = ModSet(set([('televised', 'summit'), 'DMZ', 12.6, 2019, '\"bromance\"']))  # inst. 1
prez2 = ModSet(set([('televised', 'summit'), 'DMZ', 12.6, 2019, '\"bromance\"']))  # inst. 2
prez3 = ModSet(set([('televised', 'summit'), 'DMZ', 12.6, 2019, '\"bromance\"']))  # inst. 3
print(set([id(prez1), id(prez2), id(prez3)]))  # each instance held in its own memory block

modSetOfPrez = ModSet(set([prez1, prez2, prez3]))  # define a ModSet of ModSet instances
print(modSetOfPrez.val)  # set class sees each instance as unique though they contain
                         # equivalent values in their attributes
Now let’s call our uniqueness filter. Only one member should remain.
modSetOfPrez.removeDuplicates()  # enforce uniqueness according to attribute value
print(modSetOfPrez)   # result after applying removeDuplicates()
Set operator methods
For the power set routines to come, we need instances of ModSet() to join by union and also separate by set-subtraction. Below, we define methods for these operations as well as set-intersection.
class ModSet():
    .
    .
    .
    # union-join multiple items, enforce that ModSet members be unique
    def union(self, *modSets):
        for modSet in modSets:
            self.val = self.val.union(modSet.val)  # this is union method from set class
            self.removeDuplicates()  # removes duplicate-valued instances of ModSet members

    # take set intersection of multiple items
    def intersection(self, *modSets):
        for modSet in modSets:
            self.val = self.val.intersection(modSet.val) # method from set class

    # take set difference of multiple items. Note: arg order matters here!
    def difference(self, *modSets):
        for modSet in modSets:
            self.val = self.val.difference(modSet.val) # method from set class

    # version of above method that returns a new instance for assignment.
    # Note: only two arguments here.
    def diffFunc(modSet1, modSet2):
        return ModSet(set.difference(modSet1.val, modSet2.val))
Testing ModSet union
With the set operation methods now included in the class, let’s test union-joining of non-ModSet objects.
charges = ModSet(set())
charge1 = ModSet(set(['obstruction', 'of', 'Congress']))
charge2 = ModSet(set(['abuse', 'of', 'power']))
charge3 = ModSet(set(['incitement', 'of', 'insurrection']))

charges.union(charge1, charge2, charge3)
print(charges)
The three separate ModSets have been merged into a single ModSet, charges. Notice that string member 'of' appears only once, as it should, though it is present in charge1, charge2, and charge3. Now, we’ll test union operation with ModSet members present as well.
First, we’ll nest down by one level each of the three charges, so that we can test ModSet.union(). This time we’re interested in the case when ModSet-of-ModSets are present in the pool of objects to be joined. By “ModSet-of-ModSet”, we mean a ModSet instance that has another ModSet instance as a member of its set-valued .val attribute–the result of ModSet.pushDown(1). During the union call, these ModSet-of-ModSet objects will be routed through paths of .removeDuplicates() that we’ve set up specifically for them.
charge1.pushDown(1)
charge2.pushDown(1)
charge3.pushDown(1)

charges.union(charge1, charge1, charge2, charge3, ModSet(set(['all', 'fake', 'news'])))
print(charges)
You should notice that though we have included charge1 twice in the method-call, its value, {'Congress', 'obstruction', 'of'}, appears just once in the output. So, we may conclude that the .removeDuplicates() method does correctly enforce uniqueness among ModSet-of-ModSet members. Members of {'all', 'fake', 'news'} have been included as well. Now that we’ve shown that .union() works as expected, we can move on to test .intersection().
Testing ModSet intersection
claim1 = ModSet(set(['rounding', 'the', 'bend']))  # define a new instance of ModSet
claim2 = ModSet(set(['dems', 'stole', 'the', 'election'])) # define another new instance
claim1.union(charge1, charge2)  # union-join charges 1 and 2 from above with claim1
claim2.union(charge2, charge3)  # union-join charges 2 and 3 from above with claim2
claim1.intersection(claim2)  # perform set-intersection of claims 1 and 2
claim1  # output the post-intersection result
Above we form two “mixed” ModSet() instances that contain both top-level strings as well as sub-ModSets as members. We can see, after joining the two by set intersection, the result is what we expect: only 'the' remains from the strings and only charge2 survives among the ModSets.
Testing ModSet set-difference
Above we included two methods for performing set-subtraction within the ModSet() class. The first, called .difference(), is an inline function that modifies the original instance from which it is called. Removing charge2 from charges
charges.difference(charge2)
charges
leaves charges with all but the {'abuse', 'of', 'power'} member in the result. So, check.
The second method, that we’ve named .diffFunc(), is a functional version of set-subtraction that returns the result as a new instance ModSet() leaving its originating instances unchanged. To test .diffFunc(), we’ll now attempt to remove charge1 from charges (since charge2 has already been removed in the previous step).
chargesReduced = ModSet.diffFunc(charges, charge1)
chargesReduced
You can see that the value from charge1, {'obstruction', 'of', 'Congress'}, is absent from chargesReduced, though all others from its parent, charges, are present.
Lastly, let’s examine charges to make sure that this particular instance has not been modified since last step.
charges
And there the charge remains, in all its glory, one could say…
Though our testing of ModSet() above has been far from exhaustive, we hope you are convinced that instances of it will behave as we intend them to. At this point, we can finally move on to our main objective: building power sets. We’ll do this in part three to come.
Sources (part 2)
1. Bernstein, M. Recursive Python Objects, https://bernsteinbear.com/blog. 2019.
Get ModSet()
The above code comprises the core of our ModSet() class. We’ll walk-through the power set generating methods in part three. You can download ModSet()‘s complete definition from github: modset.py
The ModSet() class by nullexit.org is licensed under a Creative Commons Attribution 4.0 International License.
Power sets in Python: an object-oriented approach (part 1)
Overview
In this three part series, we will demonstrate how to construct the power set using both iterative and recursive algorithms. You may recall, the power set of a set $S$ is the collection of all (unique) subsets of $S$, including the empty set and $S$ itself. Though Python's set class does not accept its own set objects as members, we will define a new object class, ModSet(), that encapsulates member subsets in hashable containers so that they can be included within set instance, the power set.
Here in part one, we'll use a minimal working example to demonstrate our solution to the subset inclusion problem. Next, in part two, we construct the ModSet() object with all the methods necessary to support power set generation by two distinct approaches. Finally, in part three we develop and run binary mask and recursive routines for generating power sets in Python.
Now, a bit about power sets.
Power sets defined and how to build them
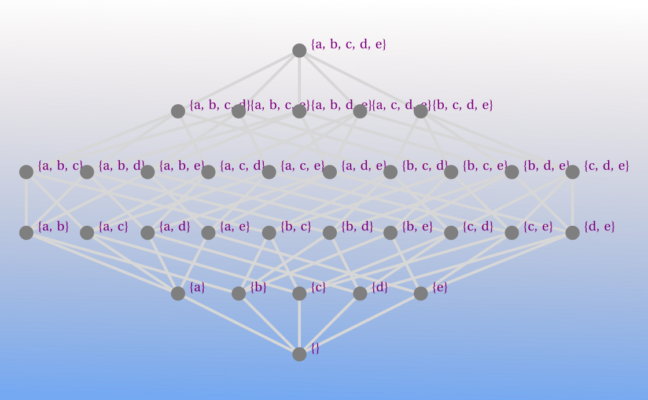
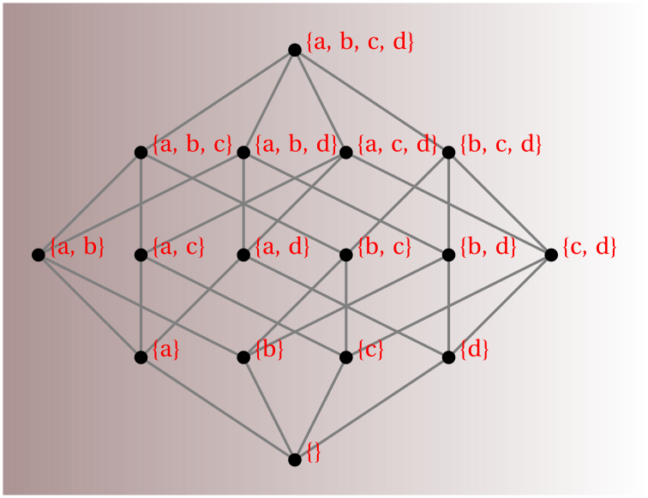
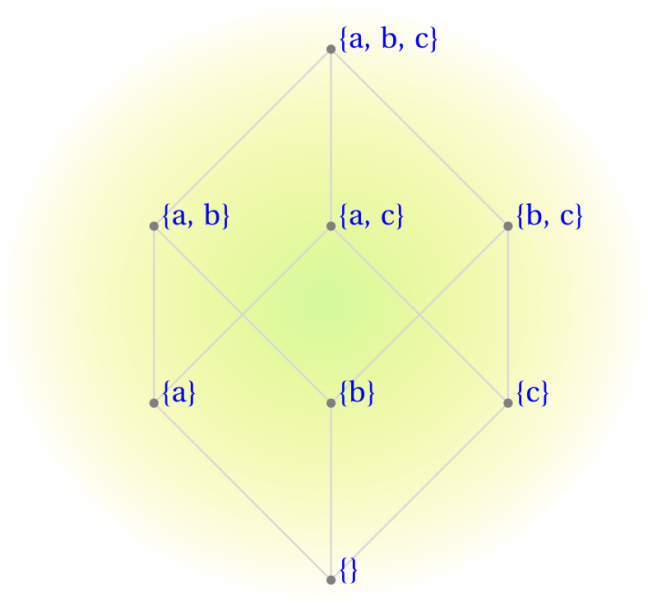
If a set $S$ has $n$ elements, its power set will have $2^n$ member subsets; these include the complete "source" set, $S$ itself, as well as the empty set, $\emptyset$. For example, the power set of set $\{x,y,z\}$ is: $\{\emptyset, \{x\}, \{y\}, \{z\}, \{x, y\}, \{x, z\}, \{y, z\}, \{x, y, z\}\}$. Please notice that there are $2^3=8$ subset elements, all of which are unique; that is, no two subsets contain the same collection of members.
Why $2^n$? Because all possible subsets can be formed by selecting their members according to digit occurrence in the base-2 integers that count from $0$ to $2^n$
Clear as mud, right? Don't worry, we'll explain.
The Binary Mask approach
Say we have a source set comprised of four members, $\{a,b,c,d\}$. The corresponding mask will have four digits that can each take on values of either $0$ or $1$. If a mask digit equals $1$ we keep the element in the corresponding location of the source set, if a digit is $0$, we reject the corresponding element.
Working with binary masks
Here's an illustrative example: binary mask $0101$ operating on source set $\{a,b,c,d\}$ would form subset member $\{b,d\}$ of the power set. Similarly, binary mask $1110$ selects subset $\{a,b,c\}$. Using the same rule, mask $0000$ selects $\emptyset$, while $1111$ forms the original source set of all four elements. There are $2^4=16$ unique bit combinations in a 4-digit binary mask, so there are $16$ unique member subsets in the power set of a four-element source set. Now, extending this procedure to a set comprised of $n$ elements rather than $4$, you can see that its power set will have $2^n$ member subsets by the same rule (the binomal theorem).
The above procedure may seem to have a certain efficiency and elegance in its directness; in this series, we'll call this method "the Binary Mask approach".
But there is another procedure we can use to build power sets...
A Recursive approach
Alternatively, you can take your source set, $\{a,b,c,d\}$, remove one of its members, $a$, then define a new subset with the members that remain, $\{b,c,d\}$, and include it as a new element in a collection. We apply the same element removal procedure to the resultant subset from the previous step, then to the result of the current step, and to the result of the next step, and so on, until we are left with a result that is empty. If we repeat the removal operation for all members of the starting set and each resultant subset, you will produce the a collection of subsets that includes the power set, with many redundant subsets in the collection as well. We'll address this issue of duplication in the next section.
Recursion walk-through
For example: removing $b$ from our source set leaves subset $\{a,c,d\}$. Removing element $c$ from subset $\{a,c,d\}$ leaves subset $\{a,d\}$. Taking $a$ from subset $\{a,d\}$ results in subset $\{d\}$. And finally, removing element $d$ from subset $\{d\}$ produces the $\emptyset$. Then we go all the way back up to the top, this time taking $c$ from $\{a,b,c,d\}$ and repeat the entire stripping procedure until we are left with $\emptyset$ as above. Next we do the same starting with members $d$ and $a$; repeating the full stripping procedure for each.
Notice that we could have removed any existing member from any set or subset at any step in the process--not only the particular members stated above. For example we could have removed $d$ from subset $\{a,c,d\}$ instead of $c$ at that step. If we explore every possible sequence of element removal, we'll notice that identical subsets can be produced by different sequences (e.g. $\{a,c\}$ results from sequence $\{a,b,c,d\} \rightarrow \{a,b,c\} \rightarrow \{a,c\}$, as well as $\{a,b,c,d\} \rightarrow \{a,c,d\} \rightarrow \{a,c\}$). So, our algorithm will need to exclude non-unique subset candidates from the collection; either as the power set is being populated or by removing duplicates after the entire collection has been formed.
Motivation and next step
This second procedure for generating power sets we'll call "our Recursive approach"1. While our Recursive approach may lack the directness and efficiency of the Binary Mask algorithm, we hope that coding it will at least prove to be an instructive, "chops-building", exercise in recursion, if no other utility can be found for it in the future.
Before we can implement either algorithm, however, we need to investigate the behavior of Python's set() class. Specifically, if it suffices for our purpose of containing subsets within an all-encompassing superset, in our case: the power set.
[Spoiler alert... it doesn't.]
The Python set class
The set class in python takes only immutable types (e.g. strings, numeric values, and tuples) as members. Under the hood, a set() object retains a hash or pointer to an immutable object that is a member.
shinyPrez = set([20.1, 2017, ('alternative', 'facts'), '\"record-setting\"'])
shinyPrez.add('covfefe')
shinyPrez
Something to notice: the ordering of elements in the set's output string does not match their ordering in its definition. Unlike Python's iterable list() class, set() objects do not retain member ordering.
When you try to insert a mutable type, lists or dictionaries for example, Python will spit back an 'unhashable' type error.
shinyPrez.add(['Cambridge', 'Analytica'])
See, no dice. Also, because set() objects are mutable, the same goes if you attempt to include a set as a member of another set.
woopsy = set([('impeachment', 'proceedings')])
woopsy
shinyPrez.add(woopsy)
Though you can join sets together, by combining unique members into a single pool, with the set.union() operation.
shinyPrez = shinyPrez.union(woopsy)
shinyPrez
Class instances can be hashed
Now, because separate instances of a class are allocated their own locations in memory, they are hashable; even if they contain unhashable values as attributes. And, even if the values of the attributes of the two instances are equivalent.
class Advisor():
    def __init__(self):
        self.val = {'Presidential', 'pardon'}  # Attribute contains unhashable set

RogerS = Advisor()   # has set for attribute .val
PaulM = Advisor()  # has same set as above for its attribute .val
modelCitz = set([PaulM, RogerS])  # include the two instances as members of a set
print(type(modelCitz))           # c is indeed a set
print([type(el) for el in modelCitz]) # members of the set are instances of Advisor class
print([type(el.val) for el in modelCitz])  # attributes of member instances are sets
We adopted the above definition from Max Bernstein's blog. Also, we can instruct that instances of the class, when called, define themselves as their .val attribute (Bernstein, 2019).
class Advisor():
    def __init__(self):
        self.val = {'Presidential', 'pardon'}
    def __repr__(self):  # method to generate representative code string
        return self.val.__repr__()  # return __repr__ code string for the
                                    # Advisor().val attribute

MichaelF = Advisor()
noHarmDone = set([MichaelF])
noHarmDone
A quick look might suggest that we bypassed set()'s exclusion of mutables here. But don't be fooled. While we have the appearance of having a set object contained within another set object, what we actually have is a set that contains a hash to an instance of Advisor() that has a set as an attribute.
print(type(noHarmDone))  # Notice that set()'s lack of indexing
print(type(list(noHarmDone)[0]))  # methods can be a bit
print(type(list(noHarmDone)[0].val))  # of a pain..!
Why define a new class?
The skeptical Python programmer at this stage is likely asking her/his/them-self: "why don't you just use a list object rather than defining a whole 'nother class for cryin' out loud!?!" Number 1, lists are not hashable; for our power set generation routines to come, we require a container that is. Number 2, lists permit duplicate entries; enforcing member uniqueness would require more coding. Finally, number 3, lists preserve element ordering; while not a deal-breaker for our purposes, lists do not mathematically qualify as sets for this reason and others.
Plan for part two
In part two, we'll define a new class, ModSet(), that will behave much like Python's set() class, but with an added set-valued attribute. Our ModSet() class will employ the same approach just demonstrated above: use of a hashable class instance to contain unhashable set objects. With these container instances themselves eligible for membership in a super-set() object. Use of ModSet objects will allow us to form an all-encompassing power set that--indirectly--has sub-set() instances as members. More than a cosmetic device, defining a set container class in this way will allow the power set of a given set object to be generated using Binary Mask and Recursion-based algorithms later on in part three.
Sources (part 1)
1. Bernstein, M., Recursive Python Objects, https://bernsteinbear.com/blog. 2019.
Setting up vsftpd for FTPS transactions in WordPress

The Problem:
If you’ve set up your own host to park your WordPress site, you probably want to be able to upload and install additional files for updates, plugins and themes. While WordPress’s File Transfer Protocol (FTP) client suffices for such transactions, FTP, in its most basic form, sends login information (i.e. username and password) in plain-text to connect client and server. When FTP connections span over the internet, unencrypted login information can pose a serious security risk to your WordPress site. The worst result being an unauthorized user taking control of your host server.
I for one, dear reader, would not want this to happen. And I very much doubt that you would either.
The Solution:
Thankfully, WordPress also supports FTP over SSL, also known as FTP-Secure or FTPS. As an extension of FTP, FTPS encrypts both commands (e.g. login information) and content (file data) in transactions across networks. Encryption shields the information from network eavesdroppers who could otherwise glean usernames and passwords being sent across when you’re connecting to your host server with an FTP client.
You can set up the Very Simple FTP daemon (vsftpd) to run FTPS on your host server to move, copy, and remove files. Here we show, step-by-step, how to configure vsftpd to establish an implicit FTPS connection with WordPress’s FTP client. Further, we set up vsftpd to run in passive mode so it will be compatible with different client configurations. Using FTP-Secure, your login information and file content will stay out of view from prying eyes when you need to update or alter WordPress.
By the way, SSL stands for Secure Socket Layer; it is the cryptographic protocol for encrypting FTP transaction data. SSL has been obsolete3 for some time now, so we will use its successor, Transport Layer Security (TLS), that is also supported by FTPS in vsftpd.
1. Install vsftpd (if necessary)
First, log into a terminal as a non-root user with sudo privileges. In case vsftpd is missing from your Ubuntu LAMP installation, you can install it with the apt-get install command
sudo apt-get install vsftpdIt’s always a good idea to save the configuration file in its original form prior to making edits.
$ sudo cp /etc/vsftpd.conf /etc/vsftpd.conf.origWe’ll make changes to, and later activate, vsftpd.conf. In addition, the unaltered version vsftpd.conf.orig, we’ll keep for reference in case our edits get out of control.
2. Set Host Firewall for passive FTPS
For FTPS to function in passive mode, you need to open a few ports in the server firewall. First things first, you need to check that your firewall is presently active.
sudo ufw statusIn this example case, as it stands right now, only the port for OpenSSH is open:
OutputStatus: active

To Action  From
-- ------  ----
OpenSSH ALLOW   Anywhere
OpenSSH (v6)   ALLOW   Anywhere (v6)
Above is just and example. Your firewall rules list may look different depending on your server setup. At this point, we need to add rules for FTP traffic.
We’ll need to open port 21 for FTPS login and commands. Port 990 is default for TLS, but WordPress appears to use port 21 exclusively, so we’ll stick with that one. Finally, the range of ports 40000-50000 we choose to open for passive mode; these values must be reproduced exactly for the pasv_min and pasv_max range within vsftpd.conf:
$ sudo ufw allow 21/tcp
$ sudo ufw allow 40000:50000/tcp
$ sudo ufw status
After these additions, the list of firewall rules should include:
OutputStatus: active

To                         Action      From
--                         ------      ----
OpenSSH                    ALLOW       Anywhere
21/tcp                     ALLOW       Anywhere
40000:50000/tcp            ALLOW       Anywhere
OpenSSH (v6)               ALLOW       Anywhere (v6)
21/tcp (v6)                ALLOW       Anywhere (v6)
40000:50000/tcp (v6)       ALLOW       Anywhere (v6)
3. List users to be given FTP access
The WordPress process runs under user www-data on your host; it is the account Apache uses to interact with files and processes server-side. Consequently, www-data should NOT be granted unfettered access to files on your server. Instead, ownership of WordPress site files should belong to another local user on your server; preferably one who does not have sudo privileges. In our case, we choose user, servusr as an example. And in this configuration, servusr will own WordPress site files on the host. Here, we use the nano text editor to add servusr to vsftpd’s list of local users to be granted FTP access.
$ sudo nano /etc/vsftpd.userlistSimply add “servusr” to the first blank line available. If you need other users to make FTPS connections, include their usernames as well, inserting each username on its own separate line. Here’s an example.
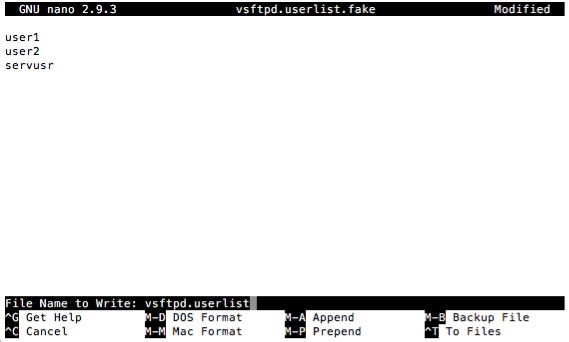
vsftpd.userlist.Once done, save and exit.
We will include the path to this file in vsftpd.conf later in step 5.
In addition to the owning user, you might also want to define a group of users that can access WordPress files as well. For our example here, we create user group wp-admins and then add each of the host users that we would like to include.
$ sudo groupadd wp-admins
$ sudo usermod -a -G wp-admins servusr
$ sudo usermod -a -G wp-admins user1
$ sudo usermod -a -G wp-admins user2
One thing to keep in mind: the more users with admin access, the greater potential there is for conflict and security breaches. It is best to keep the number of site administrators to a minimum. Using chmod g+w {wordpress directory}, you can toggle directory/file write permissions for users in wp-admins as necessary. We’ll show how to do this later on in step 7.
4. Server SSL cert and key
Find and copy the paths your the SSL certificate and key files on your host. If you do not already have a cert and key, you can generate self-signed versions and save the results in /etc/ssl/private/ or /home/servusr/.ssl/ depending on your preference. See below two examples of server CA-certificate configuration
/etc/ssl/private/vsftpd.pem # cert and key bundled in .pem/home/local_user/.ssl/vsftpd_ca_cert.crt
/home/local_user/.ssl/vsftpd_ca_cert_key.txtWe will paste the first example in the SSL section of vsftpd.conf in step 5, Configure SSL.
5. Edit vsftpd configuration file
In configuring vsftpd, we comment or uncomment directives in vsftpd.conf. Comments are preceded by #; text that follows on the same line does not affect vsftpd functionality. FYI: In addition to disabling unwanted directives, comments are there to help us, the human users, remember what does what and why–especially when we come in back six months and we need to figure out how to alter how vsftpd runs. Many directives we will leave commented out as they are not required for our setup.
Specify command port
Use IPv4 protocol, listening on port 21. WordPress does not appear to use the default port 990 for FTPS connections.
# Run standalone?  vsftpd can run either from an inetd
# as a standalone daemon started from an initscript.
listen=YES
listen_port=21
Do not allow folks to log in anonymously, however do allow some users that have a local account on the server. [The directive to check a user list for granting access is below.] Of course, WordPress requires write access to certain files and directories for updates.
Access control
# Allow anonymous FTP? (Disabled by default).
anonymous_enable=NO
#anonymous_enable=YES
#
# Uncomment this to allow local users to log in.
local_enable=YES
#
# Uncomment this to enable any form of FTP write command.
write_enable=YES
The daemon will grant access only to local users that are included in vsftpd.userlist. You should have already generated this file in step 3 above. If not, use your favorite text editor (e.g. nano) in a separate terminal and sudo save as /etc/vsftpd.userlist. Be sure to include your local user (e.g. servusr) in the list.
# Allow only certain users to log into the FTP server; local
# users that are included in vsftpd.userlist
userlist_enable=YES
userlist_file=/etc/vsftpd.userlist
userlist_deny=NO
Specify file permissions policy
WordPress requires that group be able to read directory contents and files. Therefore, we will uncomment the local_umask=022 line. If you would like users in group wp-admins to have write access as well, set local_umask to 002.
# Default umask for local users is 077. You may wish to change
# this to 022, if your users expect that (022 is used by most
# other ftpd's)
local_umask=022
Transaction feedback
The three directives that follow are not needed for FTPS, I’ve activated them to give the user feedback on file transactions.
# Activate directory messages - messages given to remote users
# when they go into a certain directory.
dirmessage_enable=YES
#
# If enabled, vsftpd will display directory listings with the
# time in  your  local  time  zone.  The default is to display
# GMT. The times returned by the MDTM FTP command are also
# affected by this option.
use_localtime=YES
#
# Activate logging of uploads/downloads.
xferlog_enable=YES
Leave the next two directives as they are from the the default configuration.
# This option should be the name of a directory which is empty.
# Also, the directory should not be writable by the ftp user.
# This directory is used as a secure chroot() jail at times
# vsftpd does not require filesystem access.
secure_chroot_dir=/var/run/vsftpd/empty
#
# This string is the name of the PAM service vsftpd will use.
pam_service_name=vsftpd
Specify passive FTP mode
The next section specifies that FTP will run in passive mode, using ports in range 40000 to 50000 for data transfer.
# We'll limit the range of ports that can be used for passive
# FTP to make sure enough connections are available.
pasv_enable=YES
pasv_min_port=40000
pasv_max_port=50000
pasv_promiscuous=YES
dirlist_enable=YES
Configure SSL
We’re in the home stretch now. In this last section we configure vsftpd to run in SSL.
To establish a secure socket, we need to specify the path to your server’s CA-certificate and key. Below is shown an example clause for this in which the cert and key are both contained within a .pem file as discussed in step 4.
# ##### SSL Config ######
# This option specifies the location of the RSA certificate to
# use for SSL encrypted connections.
rsa_cert_file=/etc/ssl/private/vsftpd.pem
rsa_private_key_file=/etc/ssl/private/vsftpd.pem
ssl_enable=YES
Below we instruct that vsftpd must encrypt both login information and file data. For security, vsftp daemon will deny anonymous connection requests.
# Explicitly deny anonymous connections over SSL and to require
# SSL for both data transfer and logins:
allow_anon_ssl=NO
force_local_data_ssl=YES
force_local_logins_ssl=YES
The daemon should encrypt using TLS only, not SSL.
# We'll configure the server to use TLS, the preferred
# successor to SSL by adding the following lines:
ssl_tlsv1=YES
ssl_sslv2=NO
ssl_sslv3=NO
Lastly, we need to include two more specifics about SSL functionality: not to require that FTP clients reuse SSL connections and SSL keys be at least 128 bits long. In case you’re wondering, rationale for these directives can be found here1.
# Do not require SSL reuse because it can break
# many FTP clients
require_ssl_reuse=NO

# Require "high" encryption cipher suites, which
# currently means key lengths equal to or greater
# than 128 bits:
ssl_ciphers=HIGH
Final step: Save and Exit
At this point we’ve completed edits to our configuration and we’re ready to restart vsftpd. In your editor, which you opened under sudo, save the file as /etc/vsftpd.conf and exit back to the command prompt. Now we’re ready to move forward.
6. Restart vsftp daemon and check status
With the configuration file now saved, you now need to restart the vsftp daemon for the changes to take effect. At the prompt, enter
$ systemctl restart vsftpdto restart and
$ systemctl status vsftpdto verify that the daemon has in fact restarted and is up and running as expected. Status output should show
$ systemctl status vsftpd
● vsftpd.service - vsftpd FTP server
   Loaded: loaded (/lib/systemd/system/vsftpd.service; enabled; vendor preset: e
   Active: active (running) since Mon 2021-01-04 03:36:57 UTC; 3h 12min ago
  Process: 14878 ExecStartPre=/bin/mkdir -p /var/run/vsftpd/empty (code=exited,
 Main PID: 14882 (vsftpd)
    Tasks: 1 (limit: 1151)
   CGroup: /system.slice/vsftpd.service
           └─14882 /usr/sbin/vsftpd /etc/vsftpd.conf
in the event of a successful restart.
7. Set directory ownership and permissions
In this important step, we navigate to where our WordPress application files are stored. We need to make sure certain directories are accessible to servusr, our WordPress FTP user, and soon to be owner, of WordPress files. An example might be
$ sudo cd /var/www/site.directory/wordpressor perhaps
$ sudo cd /var/www/site.directory/blogdepending on your server’s setup. Once you’re in the directory, you need set up ownership of certain sub-directories so that FTP can modify them. So first, we’ll change their owner and access group with chown command
$ sudo chown servusr:wp-admins . # change owner of parent dir
$ sudo chown servusr:wp-admins ./wp-content
$ sudo chown servusr:wp-admins ./wp-content/uploads
$ sudo chown servusr:wp-admins ./wp-content/plugins
$ sudo chown servusr:wp-admins ./wp-content/themes
where servusr is the username of a local user on the host server who has FTP access in vsftpd. It will be through servusr that changes to wp-content will be made. For security, do not assign ownership of any WordPress directories or files to the generic Apache user www-data. Doing so enables visitors the ability to modify your site without your say so.
Now, if you do need www-data to be able to write to these directories, I suggest adding www-data to the wp-admins group (see step 3 above), and then grant the group permission to write. To do this, change group write permissions with chmod
$ sudo chmod g+w . # wp-admins group can write to parent dir
$ sudo chown g+w ./wp-content
$ sudo chown g+w ./wp-content/uploads
$ sudo chown g+w ./wp-content/plugins
$ sudo chown g+w ./wp-content/themes
Though it seems to me that granting www-data write access–even indirectly through group membership as above–still puts WordPress at risk. And based on other posts2 about WordPress security, perhaps this concern is valid. As you’ll see below, granting www-data write permission to the five directories complies with WordPress’s file permission expectations in the Site Health tool.
So, there’s that…
But I digress… And I’ll get down off of my soap box now. After making changes to directory permissions, we need to restart Apache for them to take effect.
$ systemctl restart apache2
$ systemctl status apache2
You’ll be prompted to type in your password for the restart request.
8. Verify write status of directories
Now that you have restarted Apache, the five directories, whose ownership and permissions we modified above, should now be writeable. And we can check this using the Site Health tool in the WordPress dashboard. To do this, log in to the administrative dashboard by entering the following URL into a browser
https://your.wp.domain.name.com/wp-adminPut in the username and password for your site’s admin user, log in, and navigate to Tools -> Site Health.
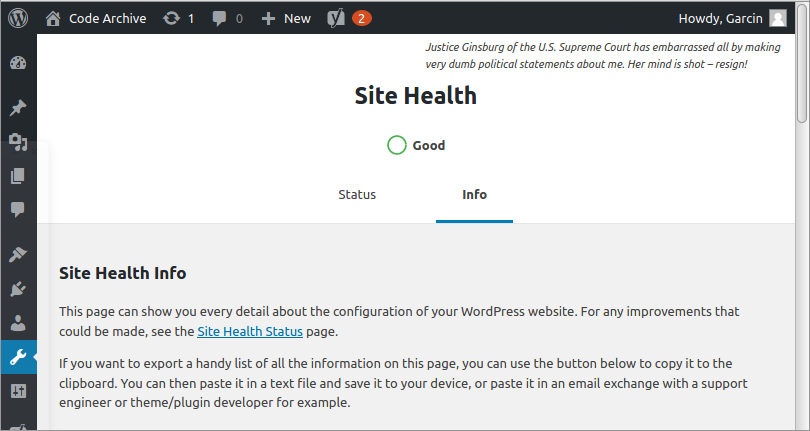
Selecting the “info” tab brings up a list of diagnostic categories. Scroll down an select the bottom-most pull out, named “Filesystem Permissions”. Listed are the five directories from above, and also whether or not they are “Writeable” by WordPress. If you did decide on granting write access to the group of which www-data is a member, your screen should appear as follows:
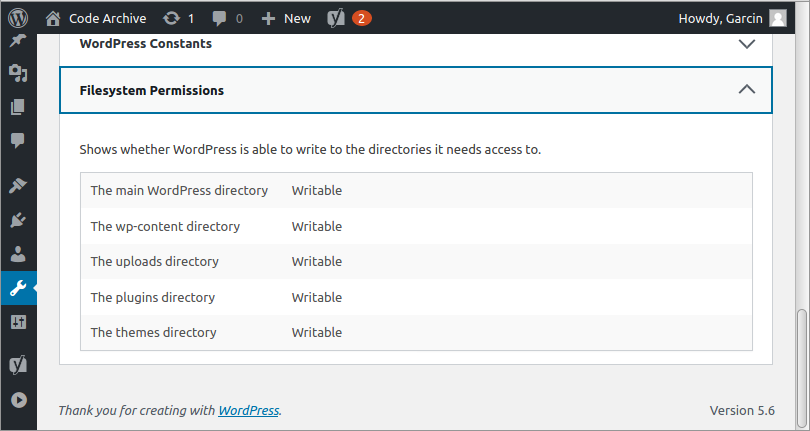
If all five are indeed writeable, you’re all set to try a plugin installation to verify your FTPS setup. Alternatively, if they show up as “Not Writeable”, likely the result of NOT granting write permission to the wp-admins group (of which www-data is a member), you should still be able to install a plugin. As long as you use the owner account of the files (e.g. servusr) to establish your FTPS connection, you should be able to access and modify the filesystem as needed.
9. Add new plugin
At this stage your can navigate to the add plugin page, select an innocuous one, like, Hello Dolly, and hit install. The login page for WordPress’s FTP client should appear.
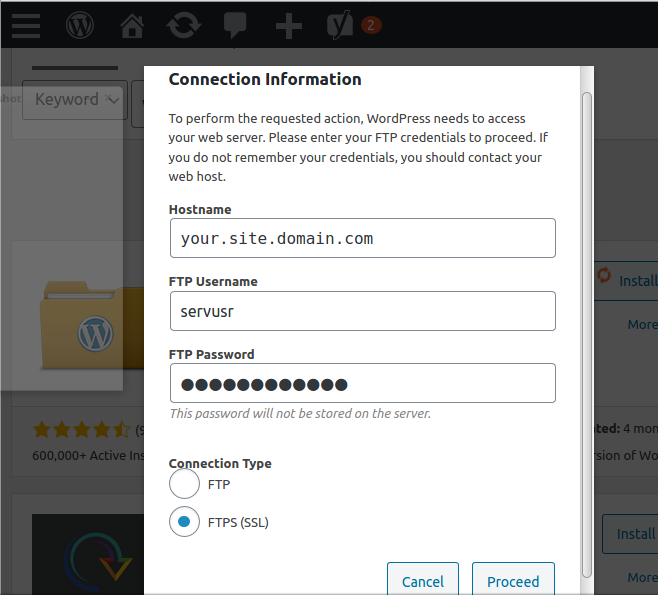
Enter your login credentials, toggle to “FTPS (SSL)”, and hit proceed. And now, please feel free to hold your breath, cross your fingers, or say a little prayer as the progress arrows churn. I always do.
If successful, you’ll see the green check mark beside “installed!” appear in the button. You’ve done it! Now you can install files into WordPress using FTP over SSL/TLS. You can rest a little easier knowing your site has one less security hole.
Sources
- Anderson Melissa, How To Set Up vsftpd for a User’s Directory on Ubuntu 16.04, Digital Ocean. 2018.
- Wright, Kristen, WordPress File Permissions: A Guide to Securing Your Website, 2019
- Wikipedia FTPS. https://en.wikipedia.org/wiki/FTPS.